
Frame the Perfect Circular PFP for Social Media — An OpenGPEX Base Walkthrough
You've got a character illustration — but the head is cropped too tight against the edge. Upload it as-is to Discord or X and the platform's circular mask will mercilessly chop off your forehead, hat, or headphones. The dreaded "cut-off PFP" strikes again.
The real problem isn't the shape you export — it's the framing. Modern platforms (Discord, X, Instagram, Bluesky) all apply border-radius: 50% to your upload automatically, so the question is: does your subject sit comfortably within that circular safe zone, or is it getting clipped? Here's how to expand your canvas, fill the background, and nail the framing in just a few steps — entirely inside OpenGPEX.
Introducing Clip & Color Options
This is OpenGPEX's core editing toolbar. Press Space at any time to enter Clip mode, where you can choose from multiple clip tools and switch between them with Tab.

Here's what each tool does:
- Selection shapes — Choose from Rectangle, Ellipse, Freehand, Magic Wand, and more. Constrain to free-form, 1:1, 16:9, or other aspect ratios via the dropdown
- Invert selection — Flip the current selection so that what was selected becomes deselected and vice versa
- Select from Alpha — Instantly create a selection from all opaque (non-transparent) pixels in the layer
- Expand selection — Grow the current selection outward by a specified number of pixels
- Branch — Create a new frame variant from the currently selected area
- Re-canvas — Resize the canvas to fit the selection bounds (crop to selection)
- Color Picker — Sample any color from the canvas and set it as your active foreground color
- Fill — Flood-fill the selected area (or the entire layer if no selection) with the active foreground color
All of these tools are used in the steps below — let's get started.
Step 1: Expand the Canvas (Create Your Safe Zone)
The subject's head is too close to the image boundary — if you uploaded this directly, the platform's circular mask would clip the top of the head or accessories. We need to expand the canvas to create a proper safe zone around the subject.
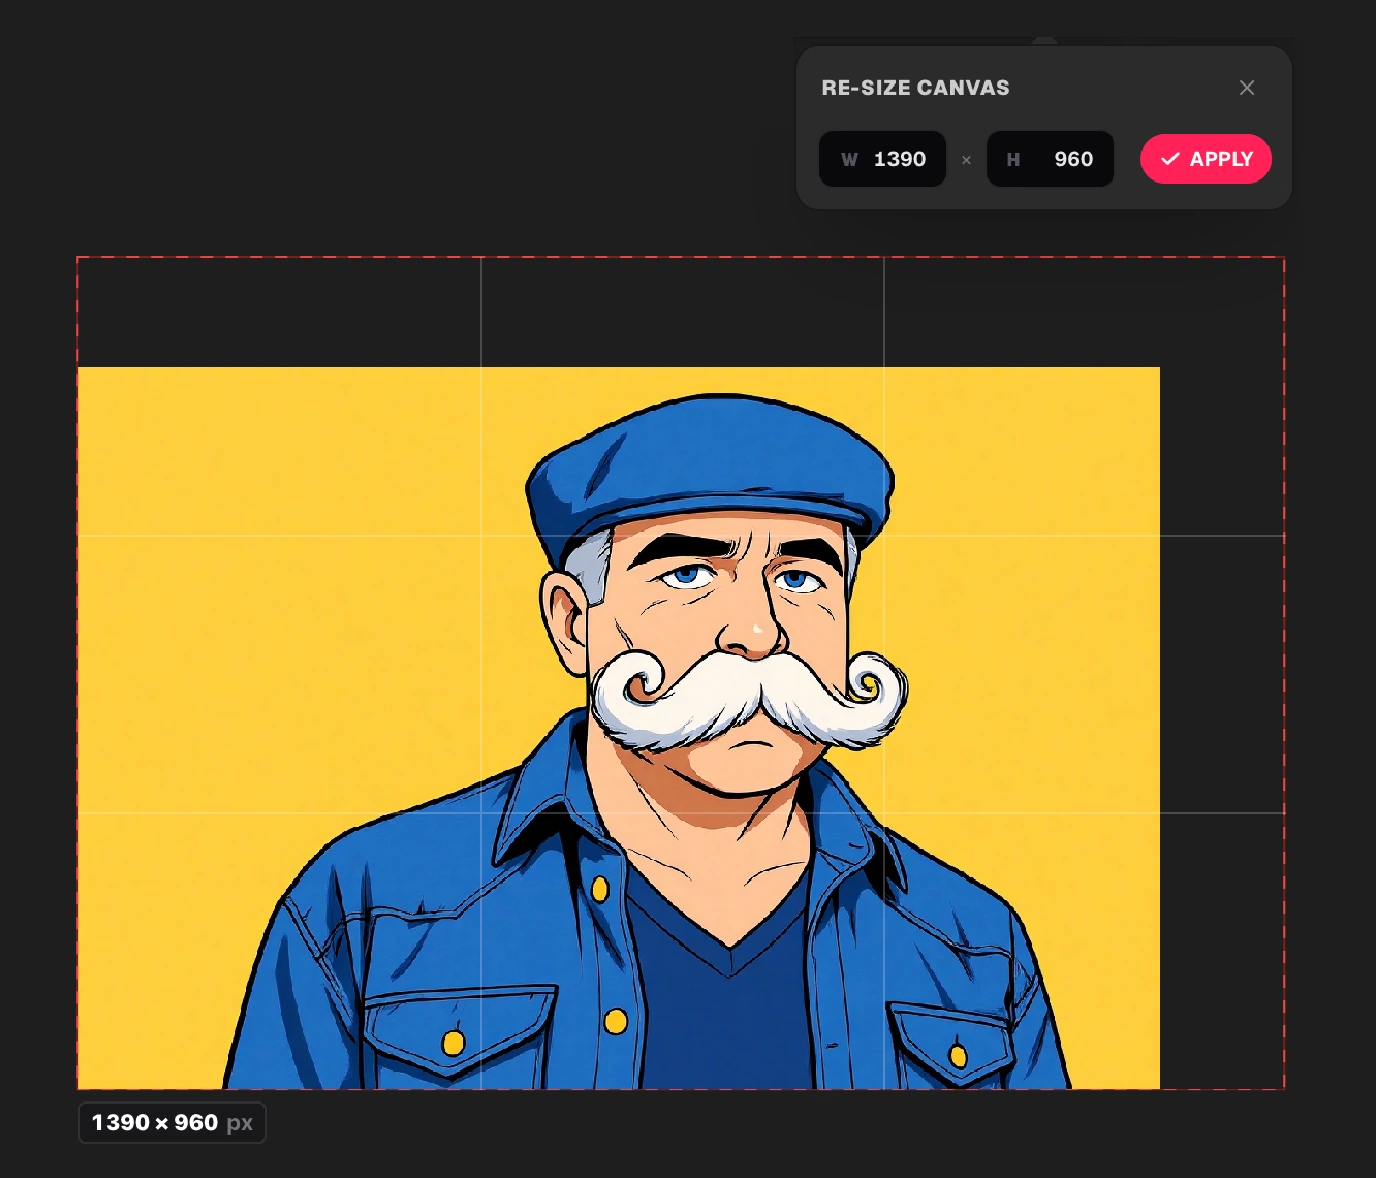
The Re-canvas feature uses a red selection overlay that lets you intuitively resize the canvas — just like using a selection tool. You can freely adjust the red selection's size and alignment relative to the canvas, or set precise width/height values via the popup under the Re-canvas button. Click Apply to confirm — expanded areas become transparent, and shrinking the canvas does not physically crop the image.
After expanding, the new area around your original image is transparent (shown as a checkerboard pattern). We need to fill it with the background color to match.
Step 2: Sample the Background Color
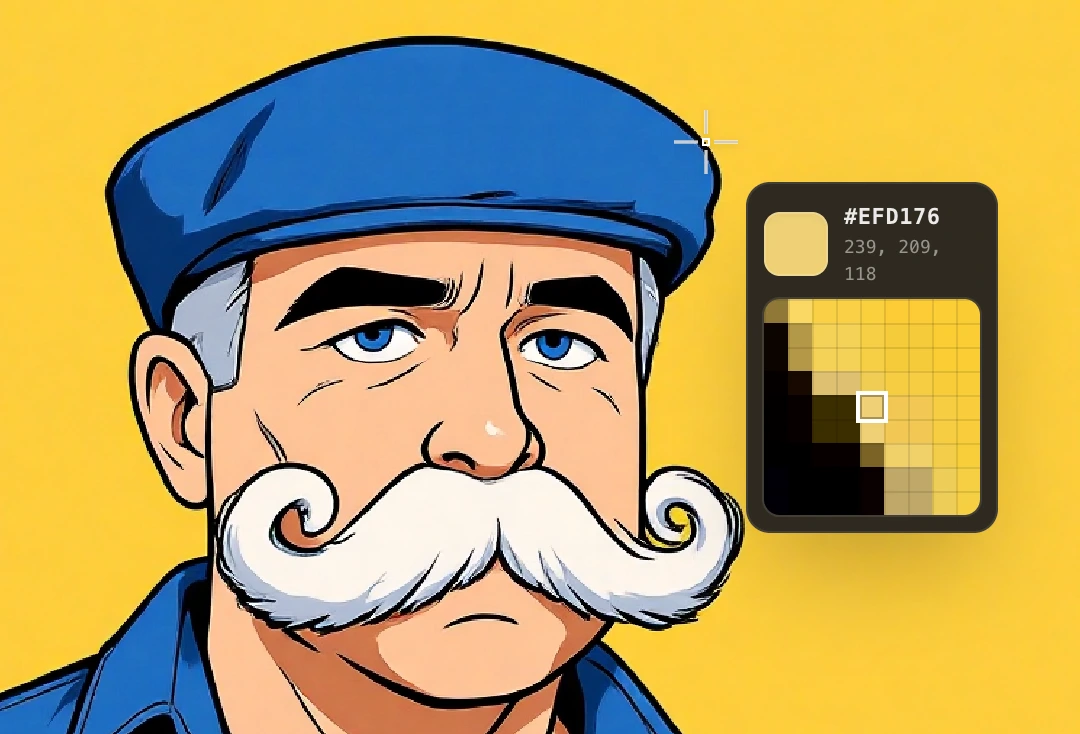
Before we can fill the transparent area, we need to pick the exact background color from the original image.
Select the Color Picker tool (shortcut I) and click anywhere on the yellow background of the original image. The sampled color is now set as your active foreground color — you can see it updated in the color indicator.
Step 3: Select the Transparent Area
Now we need to select only the newly-added transparent region so we can fill it without affecting the original artwork.
- Click the Select from Alpha button in the Clip Options toolbar (shortcut Ctrl/Cmd+Shift+A) — this creates a selection of all opaque (non-transparent) pixels in your image
- Then click the Invert Selection button (shortcut Ctrl/Cmd+Shift+I) — now the transparent area is selected instead
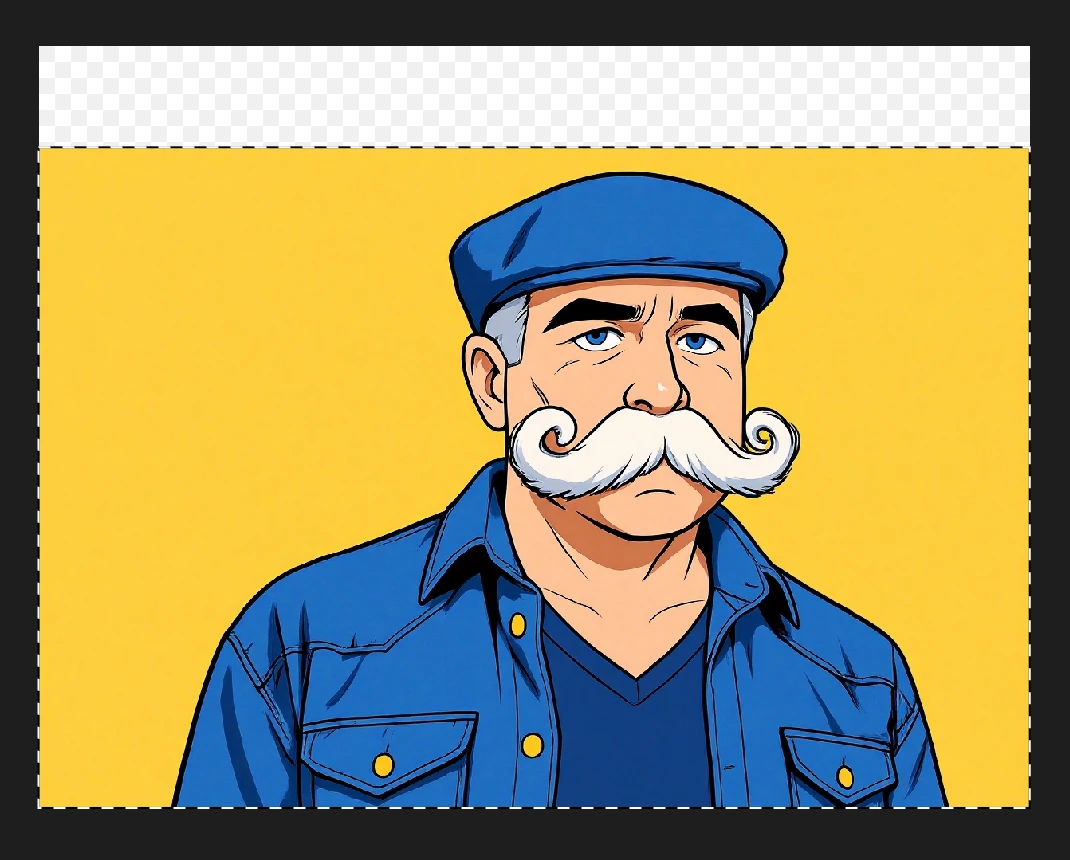
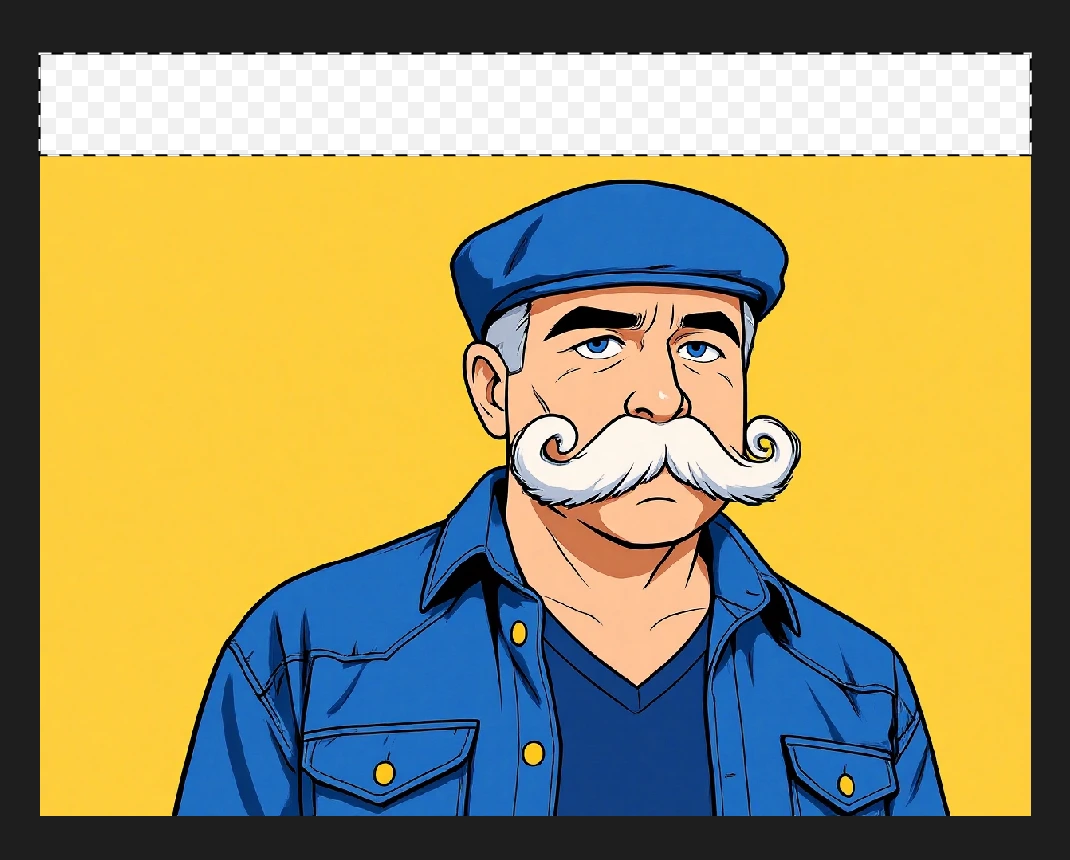
The marching ants now outline exactly the transparent border area. Your original artwork is protected — only the empty space is selected.
Step 4: Fill the Transparent Area
Click the Fill button in the Color Options toolbar (shortcut Option/Alt+Delete) — this fills the selected area with your active foreground color in one click.
The fill is non-destructive: it creates a new color layer rather than painting directly onto the original. Also note that if no area is selected, fill applies to the entire canvas.
Now you have a uniform background with plenty of space to frame your PFP.
Step 5: Frame with a Circular Selection & Export
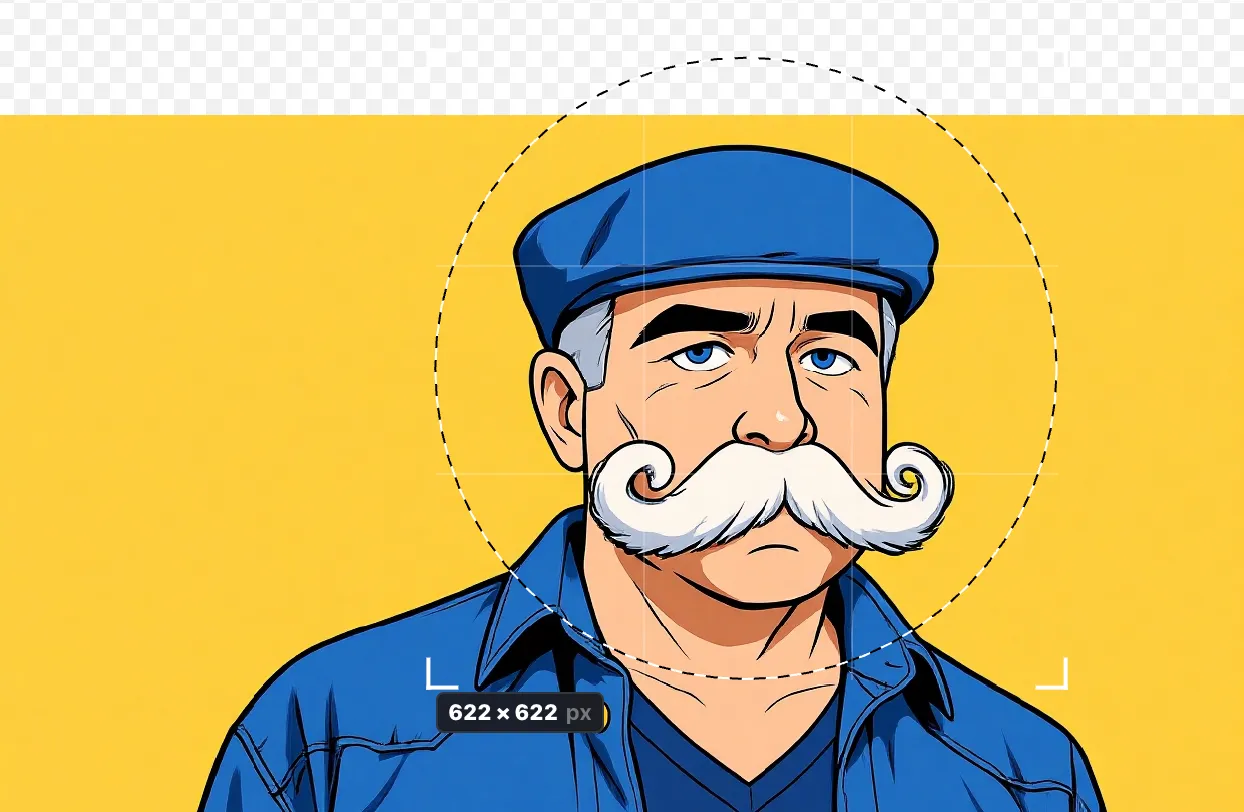
Press Space to enter Clip mode, then use Tab to navigate to the Elliptical Selection tool. In the shape constraint dropdown, select 1:1 to lock it to a perfect circle. Now drag on the canvas to draw your selection — this simulates exactly what Discord or X's circular mask will show after upload. Adjust the position and size until the subject's head, hair, and any accessories (hats, headphones, ears) sit comfortably inside the circle with breathing room to spare.
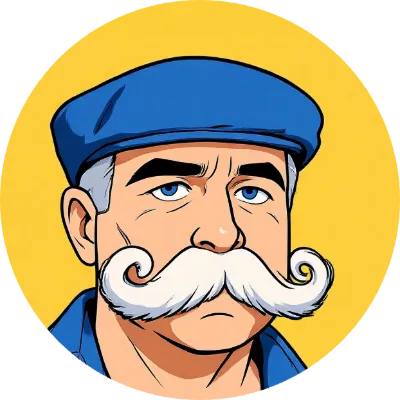
Once you have the circle positioned perfectly, go to the Information panel → Resize & Export section, set your desired output size (e.g. 400×400 — most platforms recommend this minimum), and hit Save Clip (or press Ctrl/Cmd+Shift+S).
Which format to export?
-
For uploading as your PFP on Discord, X, Instagram, Bluesky, etc. — Choose PNG or WebP and export this circular selection directly. The exported square image will have transparent corners, but that's fine: these platforms all apply their own
border-radius: 50%circular mask via CSS, so the transparent area is never visible. Your circular clip ensures the framing is pixel-perfect within that mask. -
Avoid transparent-corner issues on niche platforms — Some older forums or platforms with aggressive dark/light mode rendering may fill transparent corners with solid black or white. If you're unsure, switch to the Rectangular Selection tool (still constrained to 1:1), draw a square that tightly bounds your circle, and export that instead — the background fill from Step 4 will cover the corners cleanly.
Done — a perfectly framed PFP saved to your local file system, with the circular safe zone dialed in exactly where you intended. No more cut-off foreheads.
Tips
💡 Need a specific size? Most social platforms recommend at least 400×400 px for PFPs. Discord uses 128×128 display but accepts up to 1024×1024; X/Twitter recommends 400×400. If you want to freely resize, use the Branch feature to save the selection as a new frame, then adjust dimensions in the Resize & Export panel.
💡 When to export a square instead: On major platforms (Discord, X, Instagram, Bluesky) exporting the circular clip directly is totally fine — they mask it themselves so transparent corners are never shown. But on older forums or platforms with quirky dark/light mode rendering, the transparent corners may display as solid black or white. When in doubt, export a filled 1:1 square using a rectangular selection instead.
💡 Matching PFPs & banner coordination: If you're making matching PFPs with friends or coordinating your PFP with your profile banner, use the same expanded canvas technique for consistent framing across all variants.
💡 Keyboard shortcut recap:
- Space — Enter Clip mode
- Tab — Switch between clip tools
- I — Color Picker
- Ctrl/Cmd+Shift+A — Select from Alpha
- Ctrl/Cmd+Shift+I — Invert Selection
- Option/Alt+Delete — Fill
- Ctrl/Cmd+Shift+S — Save Clip (export)
Try It
Open your image and get a perfectly framed PFP in minutes — no more forehead casualties.
✱ All media assets in this article were edited and exported entirely with OpenGPEX.
✱ The source photo is from Pixabay (free license) and has been AI-stylized.